
It’s no secret that quilters accumulate lots of projects over the years! How do you keep track of them all? The New Year is a perfect time to get organized! Adding a label to projects is an important part of the quilting process as it helps document information about the quilt and its maker for years to come. Here are a few tips and tricks from our quilting experts to help make the process easy!
Tips from Kristi McDonough from Schnitzel and Boo:
Kristi includes the date, name, recipient name and a few words to describe why she made the quilt on the label. She also likes to include a “repair kit” in her quilts and will mark it on the label (there is an extra block/fabric located xxx to make future repairs, as needed” then when it comes time to fix anything, the recipient can open up the quilt and have an exact match. To make the repair kit, she gives her longarm quilters an extra block or pieces of fabric that are large enough to make future repairs. Just make sure to mark “the extra block” on the label! The long arm quilter then places the block or fabric between the backing and batting and longarms as usual. This will help prevent having to use unmatched fabric for future repairs. If it comes time to fix anything, the recipient can open the quilt and have an exact match.
Tips from Debby Kratovil from Quilter by Design:
- Incorporate the label into the binding so there’s no hand sewing.
- Create stand-alone labels and then interfaced them to turn raw edges under and finish it with some hand stitching or use a sewing machine. The secret is to write necessary information on one half of the label with a Pigman Micron pen, so it won’t wash out. A great place to add an extra label is on the underside of the rod pocket.
Get the free PDF instructions for Quilt labels and Rod Pockets from Debby here: https://www.dropbox.com/sh/jert5o85s57h4ta/AADcIMN40x_XfrWGatd8CMeAa?dl=0
- You can also use your sewing machine alphabet to write out the information if it has built in letters! Some brands offer designs for flourishes and borders.
Tips from Lora Zmak and Lisa Norton from Material Girlfriends:
Use a fast and easy method to labeling with printable fusible paper or fabric. Note that it can fade over time with washing, but this is a good hack to use if you are pressed with time or are looking for a temporary solution.
Tips from Kris Poor from Poor House quilts for labeling small projects:
Handwrite a length wide twill tape using a micron pen, fold it and sew it into a seam! In addition, you can take the twill tape and add some fabric borders and have a fancy label that can be stitched to a flat surface.
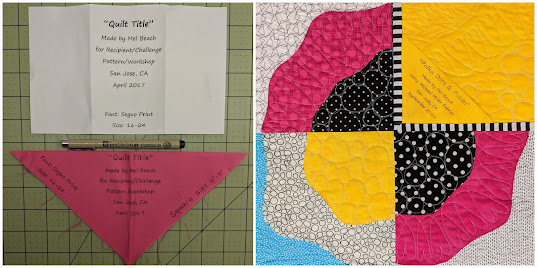
Tips from Mel Beach from Mel Beach Quilts:
- Start with a 6-8" square of a light color fabric. Cotton Couture solids are perfect because there a ton of colors to choose making it easier to match with your quilt!
- Fold in half diagonally.
- On your computer, type up the quilt label information: quilt title, maker's name(s), finish date, and other relevant information.
- Print out and place on a light box and/or sunny window with the half of the label taped on top.
- Use a Micron pen to trace the information onto your fabric. Micron pens come in different tip sizes and colors ideal for personalizing the label.
- Press with a hot dry iron to set the archival ink. Baste into the corner of your quilt before attaching the binding.
Which method of labeling will you be implementing next?
Happy Sewing and Happy Labeling!
Learn more about these quilt experts with their links below:
Kristi McDonough
Instagram: @schitzelandboo
Website: https://www.schnitzelandboo.com/
Debby Kratovil
Facebook: https://www.facebook.com/QuilterbyDesign
Website: https://debbykratovilquilts.blogspot.com/
Lora Zmak and Lisa Norton
Instagram: @material_girlfriends
Website: http://materialgirlfriends.com/
Kris Poor
Instagram: @poorhousequilts
Website: https://www.poorhousequiltdesigns.com/
Mel Beach
Instagram: @melbeachquilts
Website https://melbeachquilts.com/
No comments:
Post a Comment