Friday, June 27, 2014

Happy (almost) 4th of July!!

Here's to a lovely holiday week with family and friends!

I hope that there will be fireworks, parades, barbeques, carnivals, fairs, picnics, concerts and trips to the beach for all!

http://www.michaelmillerfabrics.com/shop/collections/petal-pinwheels.html

Let's see if we can all have as much fun as these cuties- pictured above in Petal Pinwheel and Petal Garland. I used the Wednesday Dress by Cali Faye and the skirt was my own design. 

And, how amazing is the photo below!? Pure joy. Love it!
http://www.michaelmillerfabrics.com/shop/collections/petal-pinwheels.html
*Photo credits ~ Trenna Travis Design
I used Tile Pile in coral and my go-to dress pattern, the Geranium Dress, by Made by Rae- so easy-breezy for summer! 

Please visit us on Facebook
Instagram
Pinterest
Twitter

And stay tuned for a fun, new project we're hoping to unveil next week! Can't wait!


xo,
Kait


Friday, June 20, 2014

It's a lovely time to throw an Ice Princess Party!

http://www.michaelmillerfabrics.com/shop/collections/fairy-frost.html

Last weekend we had a super fun Ice Princess Party! The girls wore beautiful princess dresses, played games, snacked on delicious treats and, of course, we all sang songs... I'm sure you can guess what they were ;) ...and now, you probably won't be able to get them out of your head!

..............

We played outside for a bit since it was a beautiful, sunny Saturday and I wanted the girls to run around before I brought out the cupcakes... So, they put on their first princess dresses and the magic began! They were so happy... you can definitely see the joy.


The dresses above were made using Fairy Frost by our friends over at Jessica Inspired Boutique. We wouldn't have been able to pull off this Ice Princess Party without them!
..............

Next stop, the Ice Palace and the Treat Table!
I used Fairy Frost for almost all of the decorations- The table topper, the chair covers, the icicle bunting, and the bows that decorate the jars! Even though I worked hard on the details, the dresses were definitely the stars of the show!
*Click here for a link to the dress. Theresa used MMF Fairy Frost in Aqua (It's covered in silver glitter which makes it oh-so-sparkly!)

Every princess needs to learn how to curtsy... and I didn't even have to stage the photo below! Little Miss A taught Little Miss O how to curtsy! Melted my heart...
*click here for a link to the dress above. It's sewn using MMF Fairy Frost in Midnite and Jet Black.

I thought the curtsy lesson deserved a treat so the girls picked "Snowballs" (aka white cupcakes with vanilla icing and coconut flakes)
I decorated their "Snowballs" with tiny icicle bunting attached to white toothpicks. I used a glue stick to attach some Fairy Frost to a piece of card stock, let it dry, and then cut out the little icicles. Then, I used a sewing machine to sew the icicles together and I tied the threads to the tooth picks. Hmmmm... maybe I have too much time on my hands :)
  I found the blue and white striped baking cups at Ikea. 

Party City has tons of blue candy (they actually have their goodies separated by color so that made things easy!) I found "Magical Ice Wands" aka rock candy and striped candy sticks along with some pretty aqua gem stones. 
I used the aqua gem stones as a game- the princesses guessed how many ice crystals were in the jar. The winner (they were both winners :) got to choose a prize from the table... 
*some close ups of the party table and prizes~
2. "goodie jars" filled with snow, a white tree and an ice crystal. *I used mason jars and baker's twine and I added a little bit of sparkly Fairy Frost to the lid so the girls would get to take home a little winter wonderland.
3. glitter nail polish, of course!
4. Marshmallows, carrot sticks and pretzel sticks aka a deconstructed snowman! The bowls are really cute- they have a line of black dots on the inside, just like a snowman's buttons!
5. I know, it's an elk... but he's so awesome! I had to :)
..............
Michael Miller's Fairy Frost is available in a lot of icy colors-
http://www.michaelmillerfabrics.com/shop/collections/fairy-frost.html

I'd love to make icicle bunting out of all of the colors and you can too! 
Click on this link for a free Icicle Bunting tutorial! 

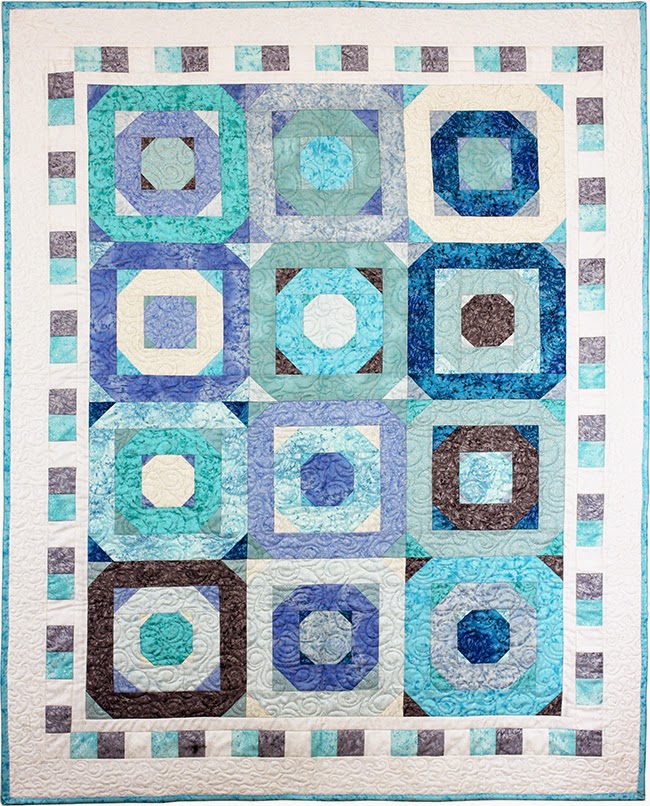
Or, make an icy quilt for your favorite princess! Click on the quilt below for the free pattern.
http://www.michaelmillerfabrics.com/inspiration/freequiltpatterns/octagon-alley-quilt-instructions-coming-soon.html
*Quilt design by Heidi Pridemore
 ..............

Have a wonderful weekend and don't forget to visit Jessica Inspired Boutique!

xo,
Kait
Visit us on Facebook, Instagram, Pinterest and Twitter

I have to post just one more :) Love them!


Friday, June 13, 2014

The Cozy Bear Blanket

http://www.michaelmillerfabrics.com/shop/collections/poly-satin.html

It took me a while but I finally sat down and wrote the instructions for the Hooded Cozy Bear Blanket! I used MMF Cozy for one side and Satin on the other... and then little Miss O gave it a test drive. Her review- "So soft and cuddly!" 

Sewing with satin and poly-satin can be challenging- it slips all over the place! I've compiled a list of helpful sewing hints so you won't run into the same issues that I did!

Sewing With Satin:
1. Use a cotton pressing cloth & press the wrong side of the fabric with a dry iron.
2. Use sharp scissors, a sharp rotary blade or pinking shears when cutting fabric to lessen the fraying.
3. If you must mark the fabric, mark on the wrong side with chalk.
4. Use a new/sharp sewing machine needle (size 14 or 16)
5. Use sharp pins (many of them!) & try to pin in the seam allowance to avoid holes in the fabric that will show.
6. If the fabric is really slippery, hand baste into place before machine stitching.
7. Use a good quality thread and small machine stitching.
8. It's helpful to layer the satin under muslin & then cut the two fabrics together (this is the technique that I used for the Hooded Cozy Bear Blanket.)

Craftsy has some really great tips for sewing satin too! Click here for the link.

Simplicity has some excellent tips for sewing satin with a machine-  such as, using a single-hole throat plate so the fabric doesn't slip into the hole and jam up your machine. It might also help to use a flat presser foot so it will run smoothly over the satin.
.........

If you'd like to make the hooded blanket, just click on the image below. And, when you're finished, send us pictures- we'd love to see what you create!
https://www.michaelmillerfabrics.com/index.php/fileuploader/download/download/?d=0&file=custom%2Fupload%2FFile-1402515574.pdf
I used Cozy in Pink and Cynthia Rowley Satin Pin Dot in Petal to make the blanket above.
.........
Need a silky satin Kimono Robe to go with the Cozy Blanket? Or maybe you'd like to treat yourself to a silky set of pj's? Don't forget to check out our other satin projects...
*We used Mod Swirls in Peach and Solid Satin in Orchid for the pj's. The pattern is McCall's M6848.

* The Kimono Robe used Tiny Guitar Picks in Gray and Solid Gray Poly Satin. The pattern is from Atelier Joy~ just click here.


Happy sewing and have a great weekend!

xo,
Kait


Friday, June 6, 2014

Game Night (& MMF Ping Pong!!)

It just so happens that our new collection, Classic Games, is shipping to stores at the same time as our MMF Ping Pong Extravaganza!

Perfect timing!

Classic Games doesn't include any ping pong prints but it does have chess, dominoes and dice...
 
Each print is a double border which you can see below...
They lend themselves well to pj pants and would make great game night tablecloths!


*We used a McCall's pattern for the pj pants (Click here for the pattern)
..............
Coming soon! The Games Quilt free pattern on our site!
*Quilt design by Marinda Stewart

..............
And, now, Game Night with Team MMF! We had an AWESOME Thursday night at SPiN New York... 

So. Much. FUN! Can't wait to go back (after some serious practice :)

Have a great weekend!

xo,kait